Showing posts with label sides. Show all posts

Friday, May 2, 2008

Fried Ravioli


I love Olive Garden. I never seem to live close by one though. So I was in the mood for some good italian and replicated one of my favorite appetizers.
Package of refrigerated cheese ravioli
Italian bread crumbs
1 egg
1 TBS water
olive oil

Place enough oil in a small pan fry the ravioli. (I used a small sauce pan and probably 1/2 C olive oil). Heat over medium so oil will be hot.

in a bowl pour out some bread crumbs (1/2 C) and in another bowl beat the egg and water.
Dip a ravioli in the egg mixture coating well, then dredge it in the bread crumbs.
Place in the hot oil and let it cook for about 1 minute on each side.
Remove once golden brown and puffed, and let drain on paper towels.

Very easy and very yummy!!
For a dipping sauce I just use 1 14.5 oz can of diced tomatoes italian style (so it has basil and oregano and garlic), put it in the blender and pulse for a few seconds. I love chunky tomato sauce to dip these tasty treats in!

Saturday, February 23, 2008

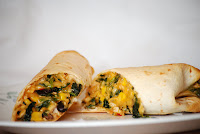
Chili's Southwest Egg rolls


We don't eat out often. Maybe once a month, MAYBE. One place we like is Chili's. After last weekend Travis has just wanted the southwest egg rolls. I must admit they are very good. So the search was on to find a recipe. And I found one! I just tried it out and I LOVE them!! It was on allrecipe.com and it is just like Chili's. A few things I did different is:
1) I baked them instead of deep frying them. I'm sure the frying would make them taste identical but I chose to bake them at 450 for 10-15 minutes and spraying PAM on them. I also only put them in the freezer for maybe two hours because we were hungry :)
2) since I have picky eaters I didn't use onions or the peppers. I used onion powder, and then 4 shakes of red pepper flakes. I think it could use a little more but i would recommend using that much until you've made them once.
3) And since I didn't want to go to the store I used dried parsley instead of fresh. I also just used canned corn instead of frozen.
4) I couldn't find the Montery Jack Cheese so I just got the mexican blend which had that in it
Now I would eyeball the recipe since the measurements are kinda weird. And it is a pretty forgiving recipe if you don't have exactly 1/3 cup of something, you know. Enjoy!

Thursday, February 21, 2008

Risotto

IF you've never had risotto I highly recommend it. It is a creamy rice but it is pretty simple to make. Travis says it reminds him of rice and cream of chicken but it isn't as fattening. I usually use this recipe from food network. I do things a little different so I'll use an asterisk to say what I do differently.
Risotto is a traditional Italian comfort food made most often with a variety of short-grain rice called Arborio, which absorbs a lot of liquid and becomes quite plump and creamy. We usually prepare rice by adding the liquid to the rice all at once and leaving it to cook, covered and unattended. With risotto, you add the hot liquid to the rice gradually, stirring constantly. All this stirring may seem like a lot of work, but the warm, creamy risotto that results is well worth the effort.
1 medium-size yellow onion
4 tablespoons butter (1/2 stick)
5 cups or more chicken broth, canned or homemade
2 cups Arborio rice (available in many supermarkets or specialty food stores)
Salt and pepper to taste
3/4 cup freshly grated Parmesan cheese

Preparing the Rice

Peel and finely chop the onion.

Melt the butter in a 4-to-5-quart saucepan over medium heat, stirring regularly.

Add the onion and cook, continuing to stir, until it turns soft and translucent. Turn the heat down if the onion starts to brown. **Since I have picky eaters I usually don't do the onion. I just use a bit of onion powder. I let that cook with the butter for a few minutes before I had the rice.**

Meanwhile, pour the chicken broth into a separate saucepan, set over medium heat, and bring to a gentle simmer. Adjust the heat as needed to maintain this simmer the whole time you are preparing the risotto. **I almost always use 6 C maybe more. I would use 2 cans and then just add 1 1/2 of water at first. If it looks like I am running out I add another cup of water.****

Once the onion is soft, add the rice and cook over medium heat, stirring constantly, for about 3 minutes. Adjust the heat as necessary -- if the rice is cooked at too high a heat, it will turn brown and take on an undesirable flavor. **This is key!! The rice will turn a bit translucent. That is when I add the liquid**

Adding the Liquid to the Rice

Using a ladle, scoop up about 1/2 to 3/4 cup of broth. Pour it in the pan with the rice, stirring constantly with a spoon. After the first addition of broth, the rice mixture will look a bit soupy.

As the rice begins to cook, stir it constantly, making sure that you scrape along the bottom of the pan so that it does not stick. You should see little bubbles popping up on the liquid from time to time. If it bubbles more vigorously than this, turn the heat down to medium-low.

When most of the liquid is absorbed into the rice and the rice begins to look a bit dry, add another ladle of broth to the pan and stir constantly, as before.

Determining When the Risotto Is Cooked

Continue to add the broth in 1/2-to-3/4-cup batches and stir the rice until you have used most of the broth (this will probably take about 20 minutes). It is now time to test whether the risotto is cooked. Spoon up a grain of rice and bite into it -- it should be tender without being too mushy. If it is still crunchy and tastes a bit starchy, you will need to continue adding liquid and cooking further. **here it usually takes 25-35 minutes depending on the day**

If it looks as if you will run out of chicken broth and your rice is still not cooked, don't be alarmed. Because of variations in individual stoves and cooking temperatures, you may need more liquid than called for in the recipe. Simply heat up another cup or 2 of chicken broth (or water).

When the rice is tender and the risotto has a creamy consistency, almost like thick oatmeal, it is done.

*Once it is done I add usually 2 more TBS butter and the cheese. I like to use sautéed mushrooms (portabella or the white buttons). I slice up a package and then sautee them in the pan with a little oil. I take them out and then follow the rest of the recipe since it cuts down on the dishes. If you use mushrooms I would recommend VEGETABLE BROTH and not chicken broth. Hope you enjoy! Remember you have to keep an eye on this and stir it a bit.

Thursday, November 29, 2007

Spicy Corn

Last night I felt like spicing up my veggies. So I literally spiced it up and it was great!! I didn't measure anything since I was just making it up, but this is pretty close.

1 can of corn drained
1 TBS butter
2 slices pepper jack cheese
2 pinches dried chopped rosemary
1/8 tsp oregano
1 tsp garlic powder
1 tsp onion powder
(You can totally use chopped onion and garlic but I don't because Trav doesn't like it. I would use 1 clove garlic or 2 if you are a garlic fanatic. And like 1/2 a small onion just saute them up first before adding the corn)
Add the butter and corn into a pan. Let it warm over med heat for 5 min.
Then add all the spices stir and cook for another 5 minutes, stirring occasionally.
Then added the crumbles cheese and let melt, stir it.

It is pretty easy but really good. Travis ate his veggies and didn't complain!

Wednesday, October 31, 2007

Witches Fingers (Soft Breadsticks)

1 pkg. regular or quick-acting dry yeast
1 1/3 c. warm water (105 to 115 degrees)
3 tbsp. vegetable oil
1 tsp. salt
Parmesan Cheese and Pam or Butter melted
sliced almonds
3 to 3 1/2 c. all-purpose flour
1 tbsp. honey
1 egg white, slightly beaten (optional)

Dissolve yeast in warm water in 2 1/2 quart bowl. Stir in 1 cup of the flour, the oil, honey and 1 teaspoon salt. Beat until smooth. Stir in enough remaining flour, scraping dough from side of bowl, until soft dough forms. Cover and let rise in warm place until double, about 45 minutes. Heat oven to 400 degrees. Stir down dough by beating about 25 strokes. Turn dough onto generously floured surface; roll around lightly to coat with flour. Divide into equal parts. Roll and shape each part dough into a skinny but not too thin rope, sprinkling with flour if dough is too sticky. Place on greased cookie sheet.
Brush with egg white, if you want, or spray with PAM cooking spray; sprinkle with the cheese. Place a sliced almond piece on one end to look like a finger nail (don't have it sticking off the breadstick though). Spray once again with PAM then place in the oven. When baking bake until crust is golden brown and crisp, about 15 minutes. Immediately remove from cookie sheet. Store loosely covered. Should make about 2 dozen breadsticks.
I made a "swamp" dip to go with the sticks. I just did sour cream and chopped green onion. Some fresh chopped parsley would be good too or just a little chopped basil.
If not doing witch's fingers don't use the almonds....or I guess you could. Maybe smashed and sprinkled on top with the cheese would be good. Instead of cheese you could do salt, or garlic butter. Whatever you like.

Wednesday, October 10, 2007

Granola

The Best of Granolas

From: Melissa Stockhoff

6 c. Rolled Oats (quick oats work best)

1 c. Melted honey (more if you wish a sweeter taste or wish to clump more)

½ c. Wheat Germ

1 c. Unsweetened Coconut

1 c. Raisins and/or other dried fruit such as pineapple, plum, apple etc.

¼ c. Sesame seeds

1 c. Nuts (more if wish- whole or chopped- Walnuts, cashews, almonds, peanuts, pecans)

½ tsp. Almond extract (optional)

2 Tbs. Vanilla

½ c. Sunflower seeds

½ c. Vegetable Oil

Mix oats, nuts, seeds, coconut together thoroughly. Pour oil and honey over mixture and stir well. Spread on lightly oiled cookie sheet and back at 275 degrees for 30 minutes or until mixture is golden brown. DO NOT OVER BAKE!! Remove from oven, pour into large stainless bowl, and add dried fruit and flavorings. Drizzle over the hot mixture ½ to ¾ cup additional melted honey and let cool. Served with milk and fresh fruit, or eat as a snack. Use for yogurt or ice cream topping. Store in tightly sealed container. Refrigerate if kept for a long time. For variety, add 1 tsp. cinnamon and 1 tsp. nutmeg. This granola is nutritionally high in fiber, minerals and B vitamins.

Saturday, October 6, 2007

Corn Salsa

I got this one from an old roommate Jan Bangerter.
Corn Salsa
1 can Pinto beans
1 can Red beans
1 can Black beans
1 can White corn
1 can Yellow Corn
1 chopped Green bell pepper
Finely chopped cilantro
Italian dressing

Drain cans and mix all ingredients. *I usually use the whole bundle of cilantro and just use the blender to chop it. And I usually use 1/4 of a regular bottle of dressing. Just add to taste. I also think it takes a couple hours in the fridge to taste blended and perfect.